Building a Eastern Road Models “CNR Double-Ended Transcona Shop Snowplow” in HO Scale: PT 2

Rejoice; I have finally put a lid on this three year on-and-off project. #55699 lives. See below for more in-progress and completed photos.

Merry Christmas, everybody. I hope all of my followers were able to celebrate generally to at least some degree. Mine was low-key, which is the norm for me anyway.

My Christmas Day miracle was applying the window glazing to this Eastern Road Model’s Double-Ended Transcona Shop Snowplow just before midnight and finally being able to call it finished. I was not finished before Christmas as I had set out in my last post, but on Christmas nonetheless. I’ll take it.

To continue my previous post, with most of the work on the plow’s body completed, I turned my focus to the cupola.

The large grab irons around the perimeter have been installed using .010″ Titchy PB wire. The Yarmouth Model Works eyebolts are visible, and as you can see I have ensured a uniform clearance from the cupola roof by using strip styrene shims between grab and cupola as the glue dried

The first thing I tackled was the large grab irons around the perimeter of the cupola roof. I thought this would be a lot more fiddly than it turned out to be, and it only took about 20 minutes. I used Yarmouth Model Works photo-etched eye bolts and .010″ Tichy PB wire for the grabs themselves with pieces of styrene strip between the grab and cupola roof to provide a uniform clearance while gluing them into place. 

Next, I added the stove stack, horn and headlights. 

The stove stack, headlights and horn have all been installed. This view will provide better context to what was done to the headlight. There is a headlight installed on the opposite end of the cupola as well

The stove stack was modified to be of the coal-burning variety by using a piece of 1/8″ styrene tube cut in half. It is a bit oversized, and I may replace it with brass at some point down the road, but not now.

The horn required only a simple hole, but the headlights were a little more complicated. The Pyle headlight was a Detail Associates part, and I glued the full headlight to a larger piece of styrene to keep it in place, while I used a razor saw in a mitre box to cut only the front of the headlight off, which was then glued to the cupola.

Next, couplers were installed. I used Kadee scale-head couplers with a short shank. I filed around the base and the top and bottom of the coupler shank (where the whiskers attach) to allow more freedom of movement in the box. I then painted the couplers and installed them using a piece of 1/8″ styrene tubing to fill the hole in the coupler box and keep the couplers in place. I used a tiny drop of CA to adhere the tube into the hole, let it set, and then painted Mr. Surfacer 500 on and around the tube before filing it all flat.

The Kadee short-shank coupler installed into the coupler box before being primed over. Visibile is the 1/8” styrene rod, and you can see traces of the Mr Surfacer 500 in and around the rod.

I taped off the couplers and then gave the boxes another quick shot of primer and let them dry.

Before painting the model, an under-frame for the weights and trucks to ride on was required. Using CAD and the measurements provided in the kit’s instructions, I drew the under-frame and cut it out of .040″ styrene mechanically with a Cricut Maker. I modified Tichy body bolsters to be only 1/8″ high from the under-frame and cut the ends off to compensate for the now lower swing of the trucks. These plows ran super low to the rails, which creates additional considerations when modelling them. 

While looking for truck bolsters in my spare parts, I found a full under-frame from a Tichy flat car kit. I decided that although it wouldn’t necessarily be accurate (the plows did retain their K-brakes for their entire service life, however), it would be a fun touch, so I added it to the blank under-frame.

The underframe. You can see the filed down and cut short truck bolsters, as well as the full under-frame salvaged from a Tichy flat car kit.

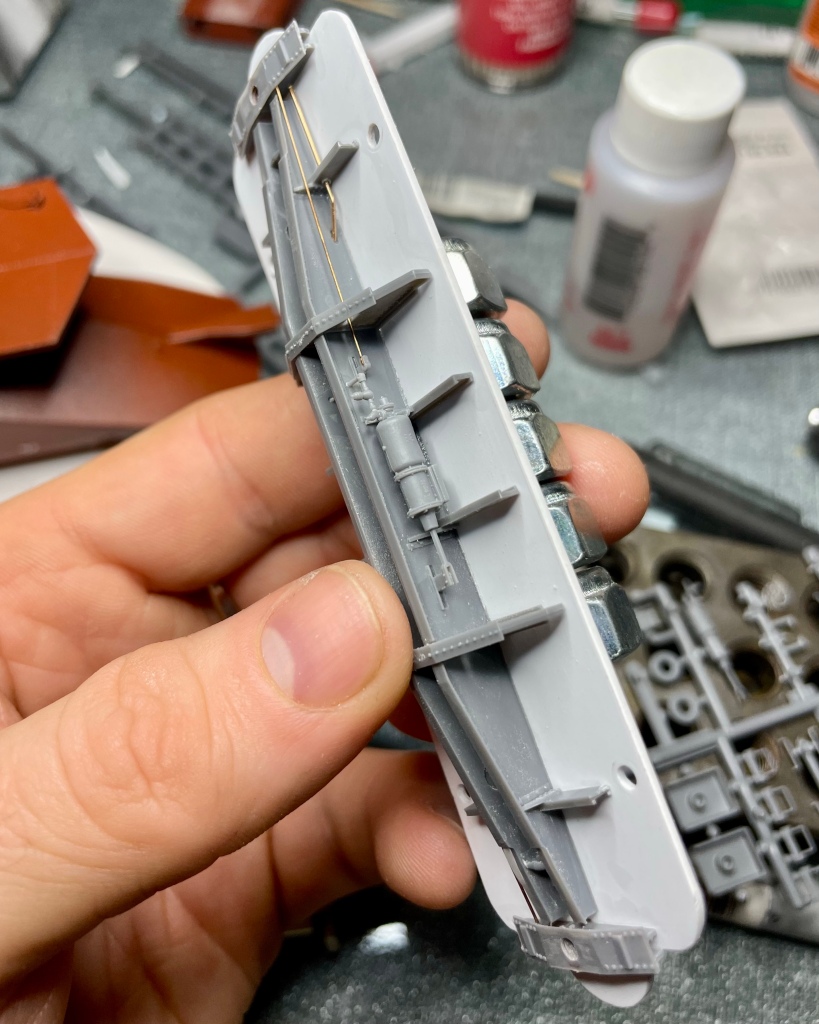
The prototype used special arch-bar trucks with a 4’2″ wheelbase. The closest I could find were Tahoe Model Works’ 5-foot wheelbase arch bar trucks (TMW-111/211). To match the prototype, I used Intermountain 28″ diameter replacement wheelsets. I threaded the screw-bosses in the 3D printed part of the bottom of the plow-body and then test fit the underframe to the plow.

At this point, it was time to paint. I used my usual mix of Vallejo paints for the body and cupola to get CN boxcar red. The inside of the cupola is painted a sea-foam green, while the seats were painted gull grey with black cushions. The stove-stack was painted aluminum, and the interior of the headlight housing was painted with glossy silver. A coat of gloss was applied with Future floor wax, and I set the model to dry for a few days before applying decals.

Paint, gloss and a road number applied. Visible is the seafoam green cupola interior and painted seats. Repack dates were added after this photo.

The decals were applied using scraps of leftover Black Cat Decal boxcar sets. Using prototype photos of plows that were kept captive to PEI in the mid-1950s, I determined that most plows at this time only had road numbers and bearing repack dates, so the plow reflects that.

#55699 all wrapped up and ready for the rails.

After painting and decals, all that was left was to install the window glazing inside the cupola. I used .005″ clear styrene by Evergreen for this, with Micro Krystal Klear to adhere it to the inside of the cupola.

Topside view of #55699.

All in all, I enjoyed this kit, but it was not for the faint of heart or easily frustrated. I’d give anybody who attempts this build the following advice: you’ve already spent a lot of money on this kit, don’t cheap out and use the Micromark rivet decals. The Archer rivets, in my experience, look much nicer. In retrospect, if I had to build the model again, I would use them instead of the Micromark decals. That’s not to say the Micromark decals look bad; they could just look better, is all. Lesson learned.

Calvin

PS: Your very own Transcona Shops Double-plow kit can still be purchased. Body here and cupola here. I have no connection to Eastern Road Models and make no guarantees of their products or the service Shapeways provides.

PPS: The next project is brought to you by the letter “S” and the number “64”…

Building a Eastern Road Models “CNR Double-Ended Transcona Shop Snowplow” in HO Scale: PT 1

Steve Hunter’s very own Double-ended plow, built from his own kit. Photo and model by Steve Hunter.

It’s been a busy and just plain overwhelming summer and fall, which has not left me with a lot of time or capacity to build.

But, with things calming down and signs of winter starting to appear, I figured that it might be an appropriate time to build the Eastern Road Model’s CNR Double-ended Snowplow kit I’ve been sitting on for a few years.

For those unfamiliar, Eastern Road Models was the moniker Steve Hunter used for his PEI prototype-focused Shapeways 3D printed model shop.

CN built a small handful of these Double-ended plows at the Transcona shops in the 1930s, and while they could be seen elsewhere in the system from time to time, I am all but sure they were built with PEI in mind; they could be seen on the island right up until abandonment.

The body and cupola are shown as primed before any detailing. Yes, my bathroom has the best lighting in the house once the sun goes down.

The body and cupola are supplied as separate purchases, and the rest is up to the modeller to source and more or less figure out.

Sparing a novel, essentially up to this point in the build, what I have accomplished is as follows:

  • Prepared the Shapeways parts by leaving them in an ultrasonic bath filled with a mixture of Simple Green HD and water.
  • Sanded the body of print lines and removed any excess wax material from the printing process.
  • I drilled for the grab irons and other necessary holes.
  • I primed the body and cupola.
  • Applied Micro-Mark rivet decals to the body and cupola (has to be closing on 1000 rivets).
  • Bent all grab irons from scratch, including the drop grabs, using .010” PB wire.
  • Installed the brake wheel and staff.
  • Installed the wire, receptacles and snow shields for the snowplows power connections with the locomotive.
  • Installed hinges on the journal box access hatches using Grandt Line reefer hinges.

All that remains is the installation of the roof grabs around the cupola, stove stack, horn, headlights, paint, decals, couplers.

Hoping to get this finished off before Christmas.

Calvin

BUILD RUN-DOWN #1: “Funaro & Camerlengo #120 CNR 8 Hatch Reefer #209667” Flat Resin Kit (HO Scale)

As my modelling slowly starts to ramp up again, there isn’t much content for me to post. However, I realized that the projects I completed before this blog’s existence are not yet documented here. I thought it might be fun to fill in the slow times with what I’m going to call a BUILD RUN-DOWN. I felt the right place to start would be with a Funaro & Camerlengo CNR 8-Hatch Reefer kit I built a couple years back.

(Click for source)

Between 1939 and 1958, the CNR had built for it over 3000 8-hatch steel reefer cars. F&C has built flat resin kits to represent these cars for 20+ years. I have a handful of the True Line Trains ready to run models, but I wanted to paint one up with the red maple leaf and #11 red under-frame.

A completed CNR #209667.

The kit was built, mainly adhering to the included instructions. However, I provided some enhancements by upgrading and adding a few details. (I will provide a parts list at the end of the post.)

Construction began by cleaning up all of the flat kit castings and giving them a bath in Dawn Dish Soap to remove any mold release agent.

The truck bolsters on the car’s under-frame were then drilled and tapped, and the same for the couplers. At this point, while the kit was still flat, I drilled out most of the holes required for grab irons, eye bolts and the heater pipes. However, some of the holes were left undrilled until the body was assembled to ensure their placement would be accurate.

Once I was satisfied that I had removed all of the flash and mold release agents from the parts, I used 1-2-3 blocks, tape, patience and a minimum initial amount of CA to assemble the flat car sides, ends and roof into a 3D body shell. At this point, I turned my attention to the under-frame.

Completed under frame.

I used various sizes of Tichy phosphor bronze wire for the brake rigging. My standard approach for this is to use .015,” or .020″ wire for the train line (if I include it), .0125″ wire for the brake rods, .010″ wire for the air-lines and .008 wire for the retainer line and release rod, the latter which I usually wait and add after the model has been fully painted and the underframe has been glued in place. Tichy turnbuckles cut in half were used to simulate the Yarmouth Model Works brake levers’ clevis. The piping going to and from the underslung heater was added with piano wire. (In hindsight, you may have better luck with some Tichy .038″ PB wire as cutting piano wire this thick was NOT fun. I eventually had to use aviation snips.)

This photo shows how I used masking tape marked with lines to properly align the installation of the hatch rests.

Once I was happy with the underframe, I moved to the car body. As I mentioned above, I adhered mainly to the kit’s instructions, so I won’t bother getting too detailed. However, I will say out of all of the upgraded detail parts I used, I think the Des Plaines Hobbies Canadian Style 8 Rung Ladders and Yarmouth Model Works running boards made the most significant visual difference; I can’t recommend these parts enough for your next Canadian prototype build. 

The completed car, prior to painting.

The hatch rests, tack + defect boards, brake wheel mount and jacking pads were built with Evergreen strip styrene. This was all pretty straight forward except for the hatch rests. The hatch rests included with the kit left a lot to be desired, so I used a tip I read on Pierre Oliver’s blog and made them out of strip styrene. A strip of 1×3″ and 1×6″ styrene was glued together in an “L” shape, which I then cut to equal sizes with my NWSL Chopper II. To have the hatch rests appropriately centred on the model’s roof, I laid out strips of masking tape on my workbench. I measured out the proper distances and drew lines on the tape to use as a guide, then taped the strips to the roof of the model and glued the hatch rests on with CA using the tape lines as a guide.

I primed the car with Tamiya Fine Surface primer- the bottom section of the car got primed with Oxide Red while the body got primed with Grey. I then loaded up my airbrush with black paint (VMA 71.057) and pre-shaded all of the panel lines, grab irons, brake rigging, running boards— virtually anything I wanted to stand out. I then painted the model, as usual, allowing the pre-shading to very lightly appear through the paint. The car’s bottom was painted #11 Red while the body was painted #11 Grey and all paints were Vallejo Model Air. To get #11 Red, I mixed 2pt VMA 71.105 to 1pt 71.038. For #11 Grey, I used straight VMA 71.045. After the model was painted, I used a #0 brush to paint anything attached to the body but falling under the sill (such as grab irons, stirrup steps etc.) #11 Red.

The lettering process.

Before lettering the car, I sprayed it with Testors Glosscoat and allowed it to cure for four days. The car was lettered with Black Cat Decals [CNR#209710-H] instead of the ones included. I also had some Speedwitch Media freight car chalk markings (highly recommended), which I later added. To get the particular car number and correct data information I wanted onto the model, I had to do some surgery on the decals. I wound up placing a lot of the numbers individually, which was time-consuming. After lettering was finished, the car was again sprayed with Glosscoat followed by Dull coat and allowed to cure.

Another angle of the completed car.
My completed kit (right) next to its True Line RTR counterpart.

All in all, I was very satisfied with how this model turned out. I gained a lot of experience and tried many new-to-me techniques.

Next time I’ll be giving a rundown on a Yarmouth Model Works 40ft CNR boxcar I completed a year ago.

Thanks for reading!

CM


COMMERCIAL DETAIL PARTS USED:

  • “HO Canadian 8 Rung Ladders” / Des Plaines Hobbies [DPH-2003] x1 Package
  • Laser Cut 40′ Wood Running Board w/ Laterals & Etched Brackets / Yarmouth Model Works [YMW-255] x1 Package
  • “Eyebolt No Collar” / Yarmouth Model Works [YMW-500] x1
  • “Eyebolt w/ Collar” / Yarmouth Model Works [YMW-501] x1
  • “Bracket Grab Drilling Template” / Yarmouth Model Works [YMW-502] x1
  • “Brake Levers, Set of 10” / Yarmouth Model Works [YMW-503] x1
  • “AB Brake Set” / Tichy Train Group [#3013] (included w/ kit) x1
  • “Turnbuckles” / Tichy Train Group [#8021] x1 Package
  • “Straight Side Mount (Stirrup)” / Tichy Train Group [#3038] (included w/ kit) x1 Package (Tip: After all of my upgrades, I do find these are left looking a little out of scale. Perhaps an A-Line product would have been better suited.)
  • “HO 22” A.A.R. Air Hoses w/Brass Brackets” / Hi-Tech Details [HTD-6040] x1 Package
  • “HO Blackened Brass Chain / 45 Links Per Inch” – Crescent Locomotive Works (eBay seller)
  • “Barber S-2 50-Ton Trucks” / Tahoe Model Works [TMW-213] x1 Pair
  • “Semi-Scale .88 Wheels” / Intermountain Railway Company (came w/ trucks) x4
  • “Scale Whisker Metal Couplers Med Centerset Shank” / Kadee Quality Products Co [#178] x2
  • “Side Grab Irons – Red Oxide” / Kadee Quality Products Co [#2250]
  • “Scale Snap-Together Gearboxes and lids” / Kadee Quality Products Co [#178] x2
  • “Westinghouse Single Pressure Retainer Valves” / Precision Scale Co [#3263] x1
  • DECALS:
  • “CNR 8 hatch reefer leaf scheme 1953-1961” / Black Cat Decals [CNR#209710-H]
  • “Freight Car Chalk Markings” / Speedwitch Media [D135]

SCRATCH-BUILT PARTS USED:

  • Hatch Rests x16 – Scale strip styrene cut with a chopper tool and glued together in “L” shape
  • Defect Boards x2 – Scale strip styrene cut and assembled
  • Tack Boards x4 – Scale strip styrene cut and assembled
  • Drain Spouts x4 – Tichy PB wire inserted into holes drilled into car bottom and glued from the inside. Square styrene strip cored out with a pin vice and then slid over the PB wire, dab of CA secures the styrene to the bottom of the car and wire.
  • Brake Lines – .010 Tichy PB wire measured, cut to size, bent with pliers, inserted and glued into brake components.
  • Brake Rods – .0125 Tichy PB wire cut to size and inserted into Tichy turnbuckles which were cut in half and thinned down to simulate the clevis.
  • Coupler Cut Levers x2 – .008 Tichy PB wire cut and bent to shape. Inserted through bracket on car end and through YMW “Eyebolt No Collar” above coupler.
  • Release Rod x1 – .008 Tichy PB wire cut and bent to shape. Inserted through hole drilled into sill and through YMW “Eyebolt No Collar”, drilled and inserted into triple valve.
  • Stand-offs for DPH 8 Rung Ladders x8 – Strip styrene cut and glued to ladders, then ladder glued to car.
  • Underslung Heater Piping x2 – Music wire cut, bent and inserted through holes drilled into the sides of the underslung heater casting and through holes drilled into the car floor. Glued from the inside of the car with JB Weld 2-Part Epoxy (the 15-Minute stuff)