Scratch-building CN’s 40′ Wood End Bunker Reefers PT:5 [Underslung Charcoal Heaters & their Piping]

Small update coming at y’all- and while it’s small, the process behind this was large.

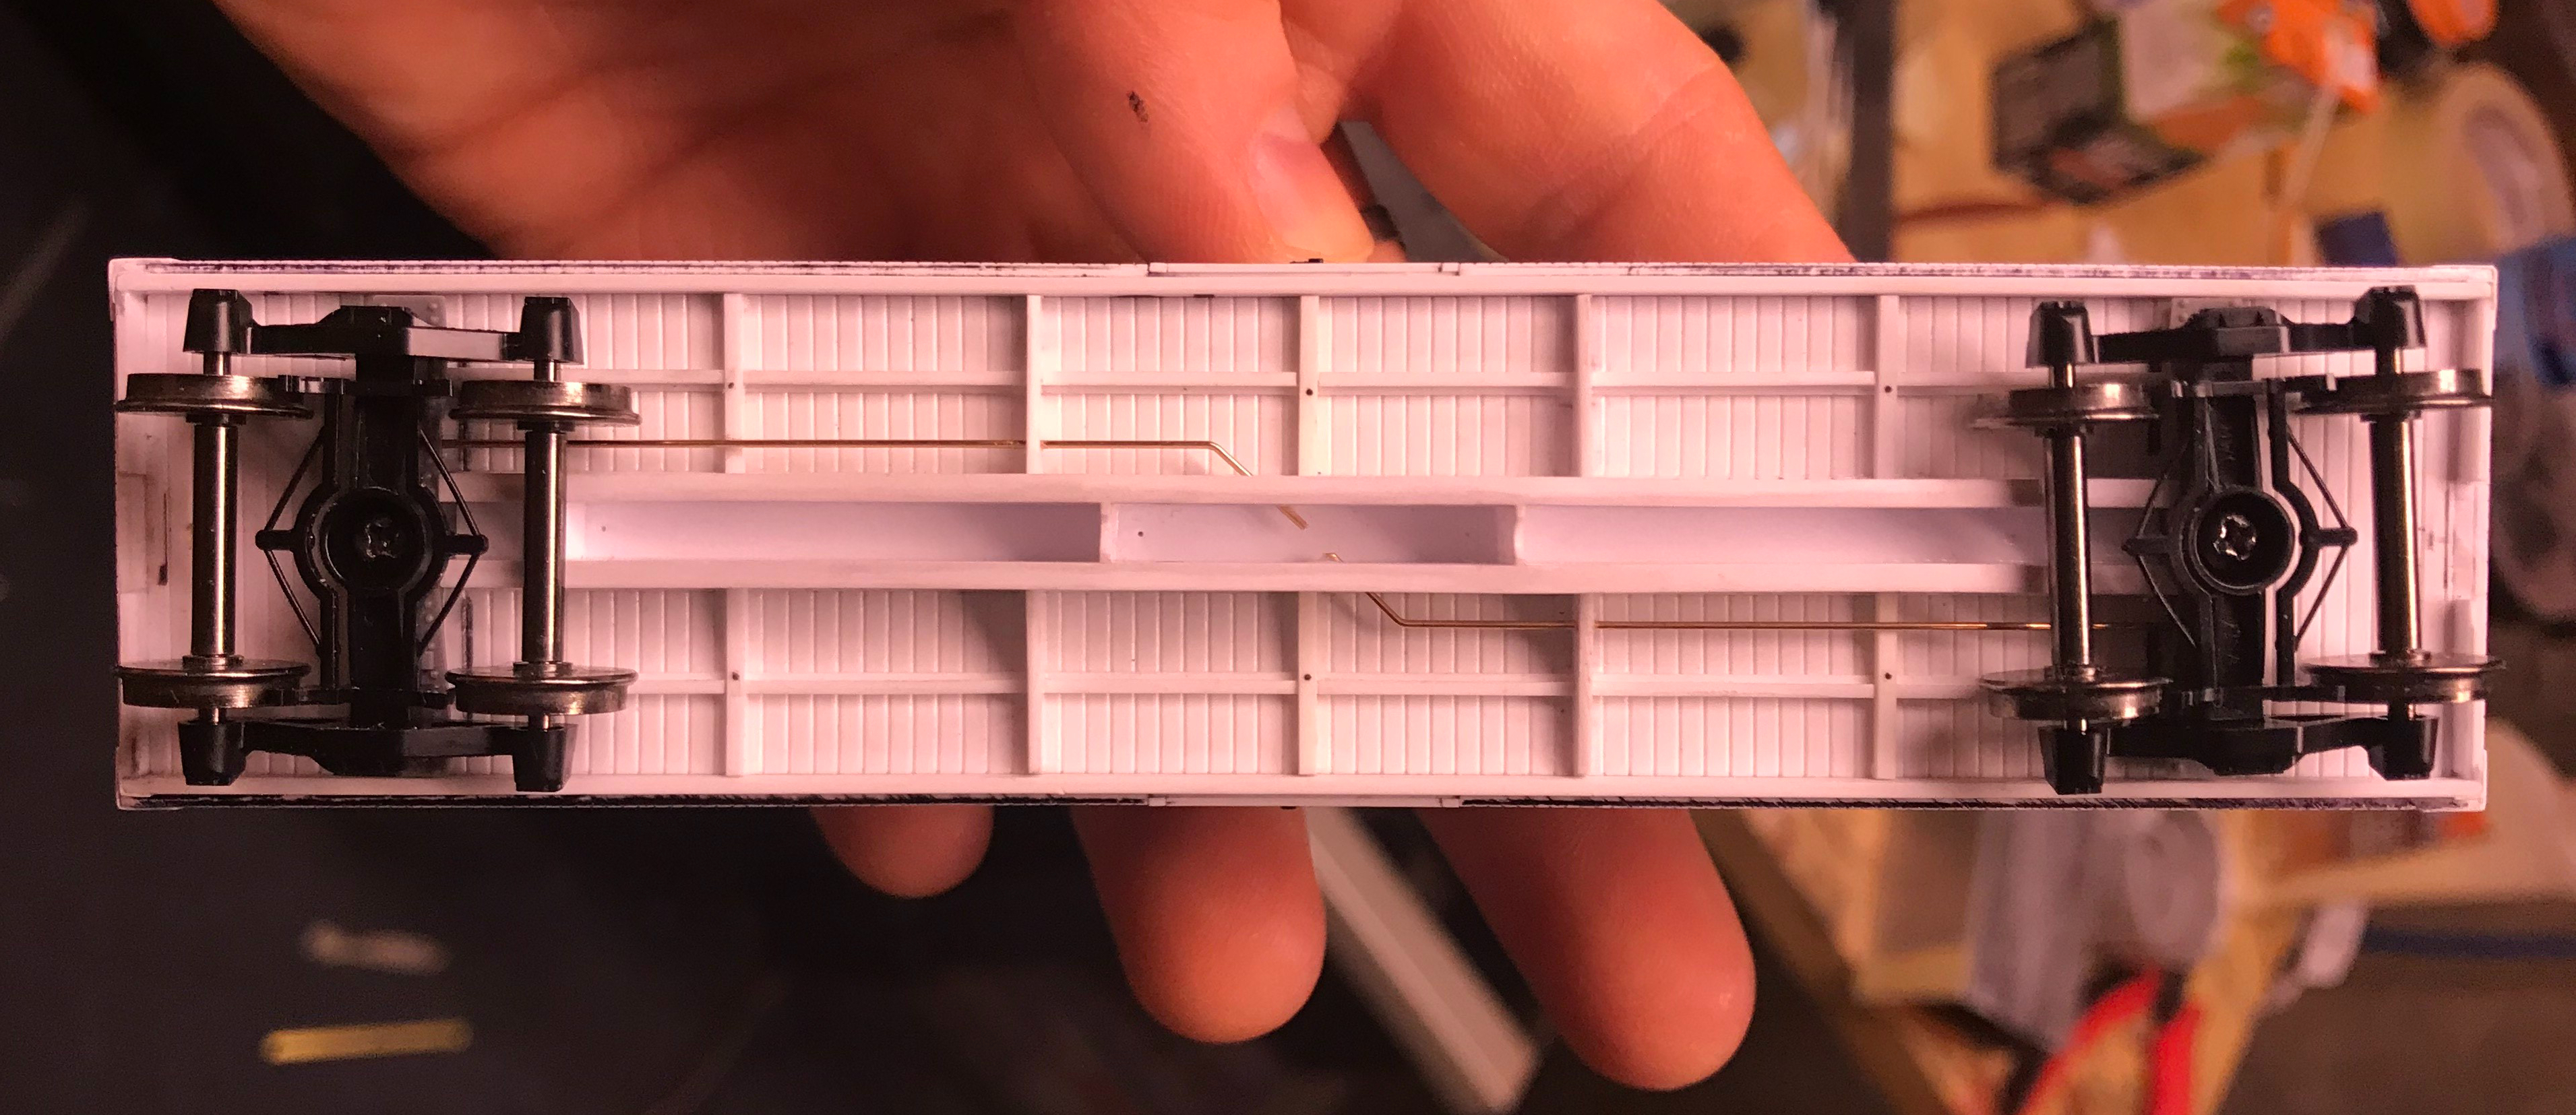
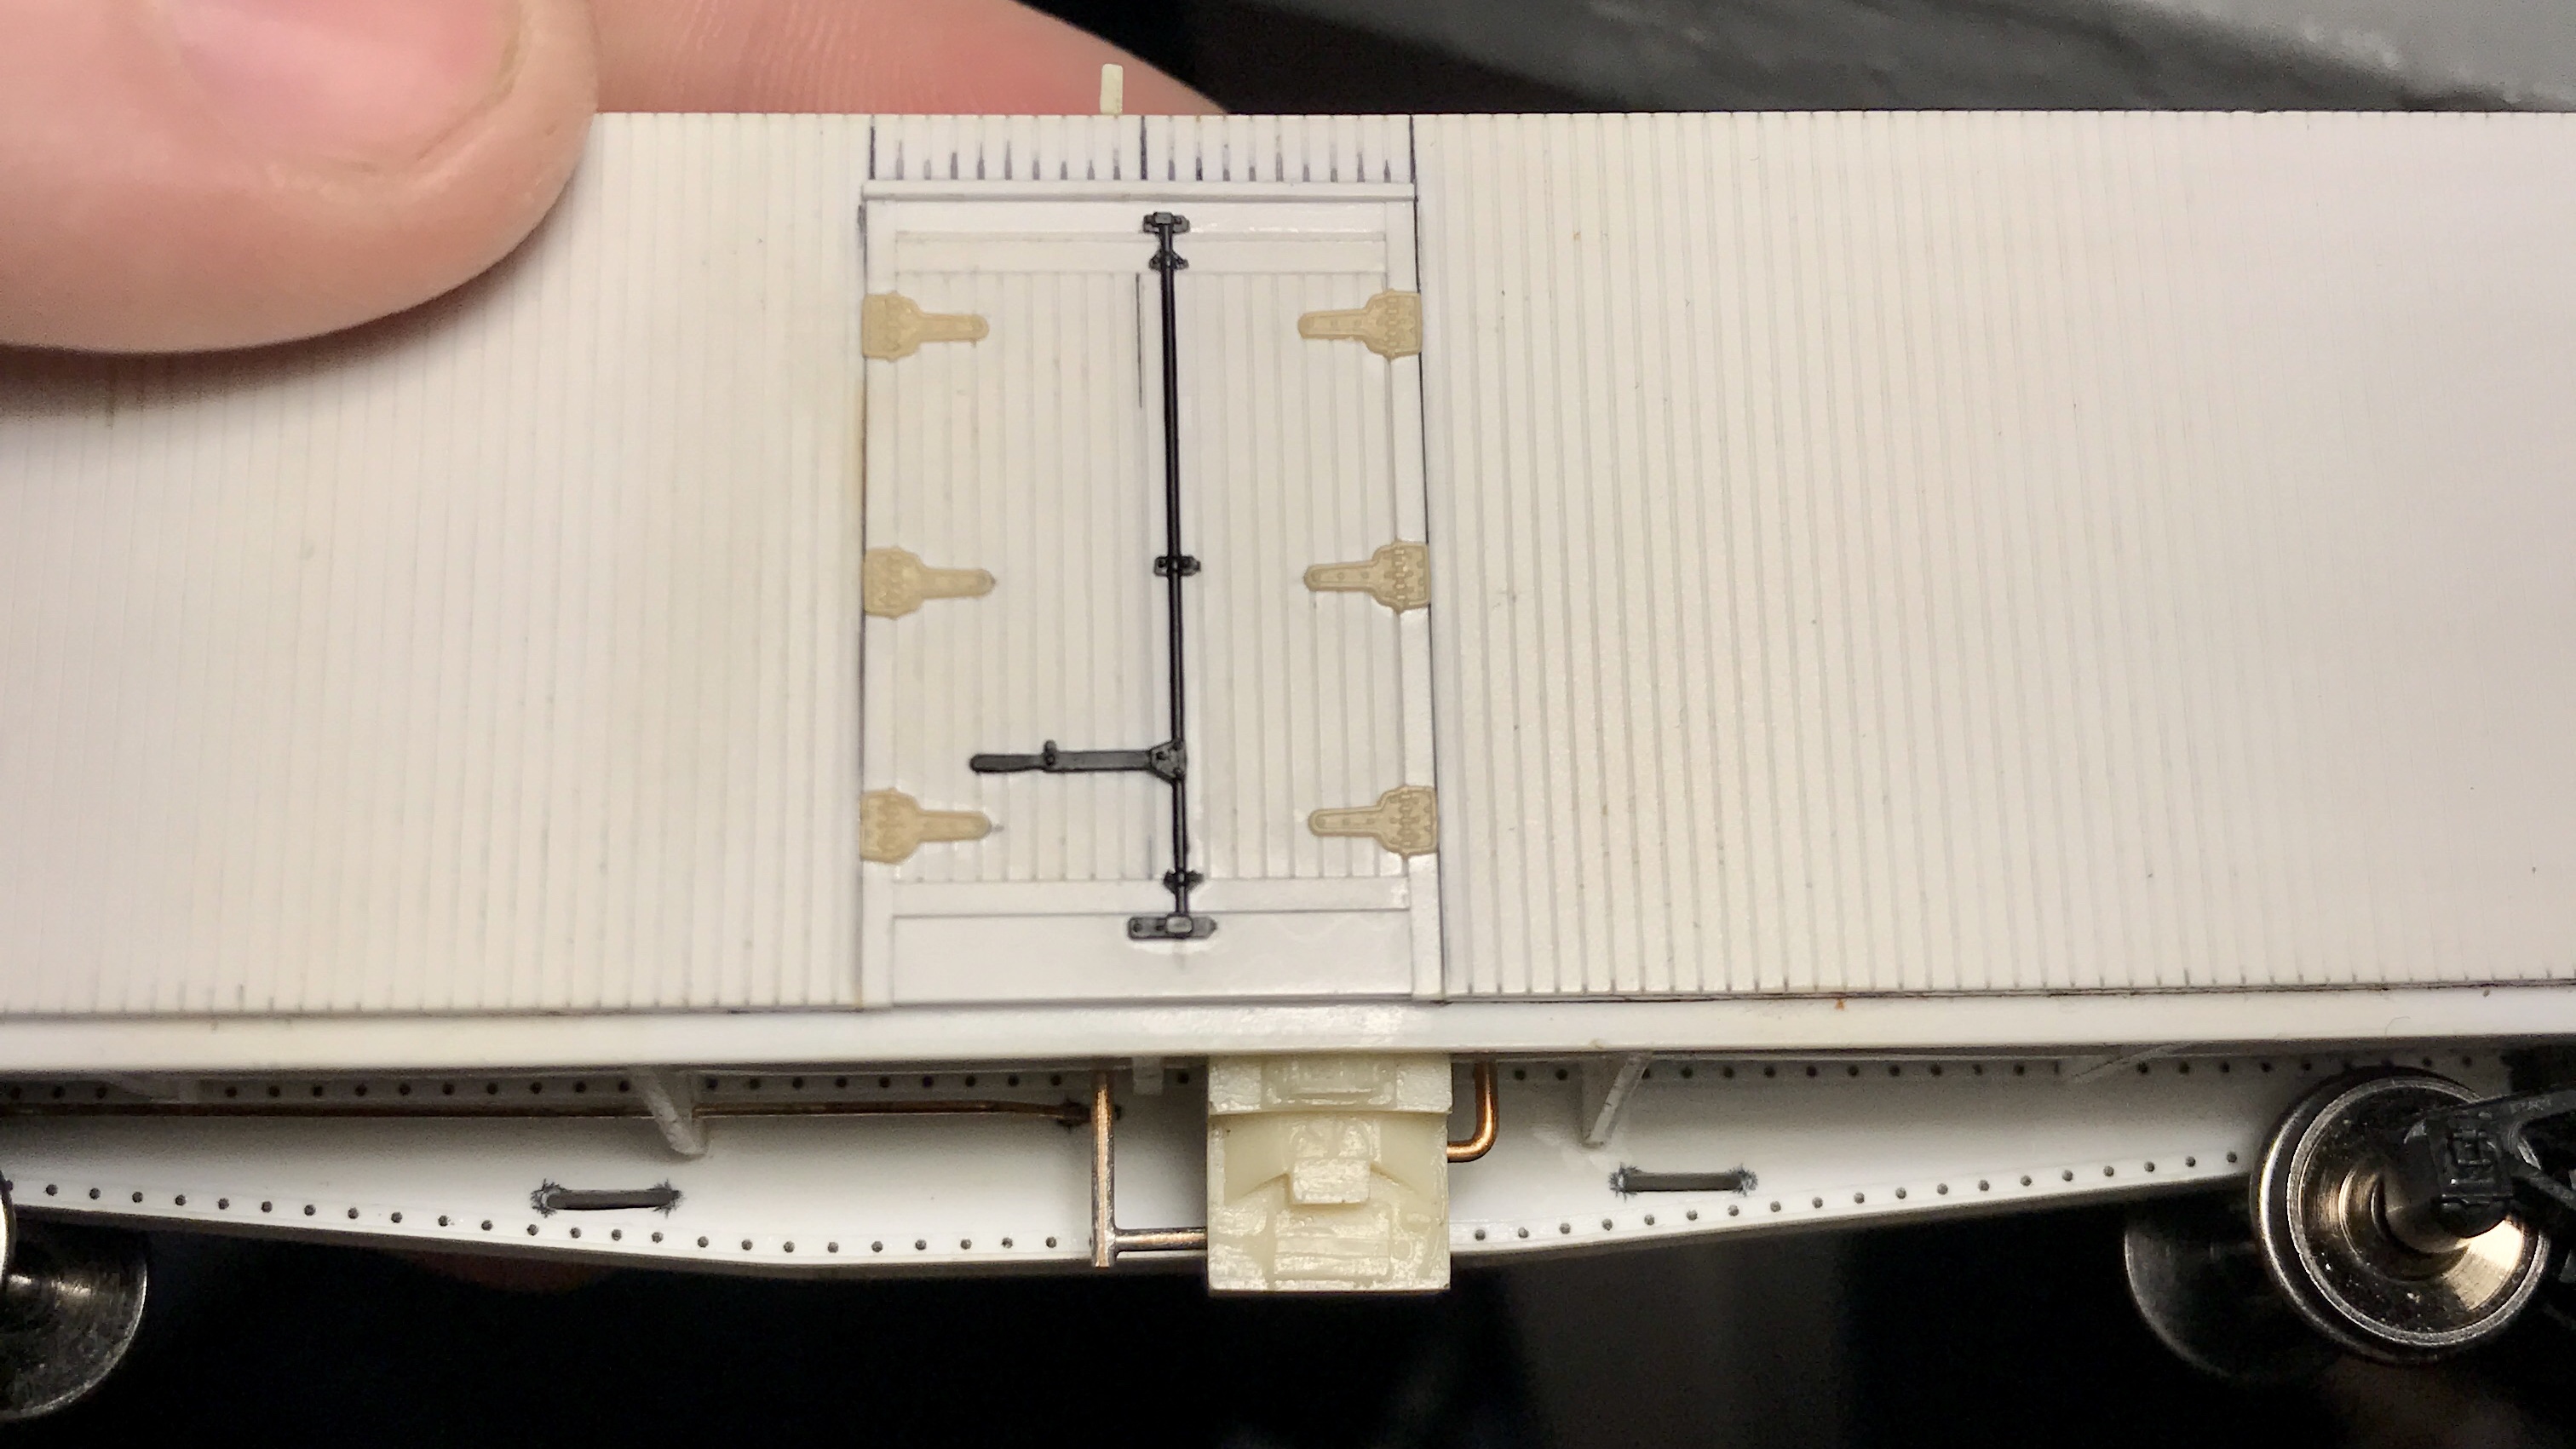
Last night, in the final hours of my 20s, I installed the underslung charcoal heaters and their piping onto Reefer cars’ underframe.

The heaters were resin copies I cast of a certain manufactures underslung charcoal heaters that I could not purchase individually from a kit. I cut a notch out of the previously installed Z-bracing and then affixed the heater right to the car floor with CA.

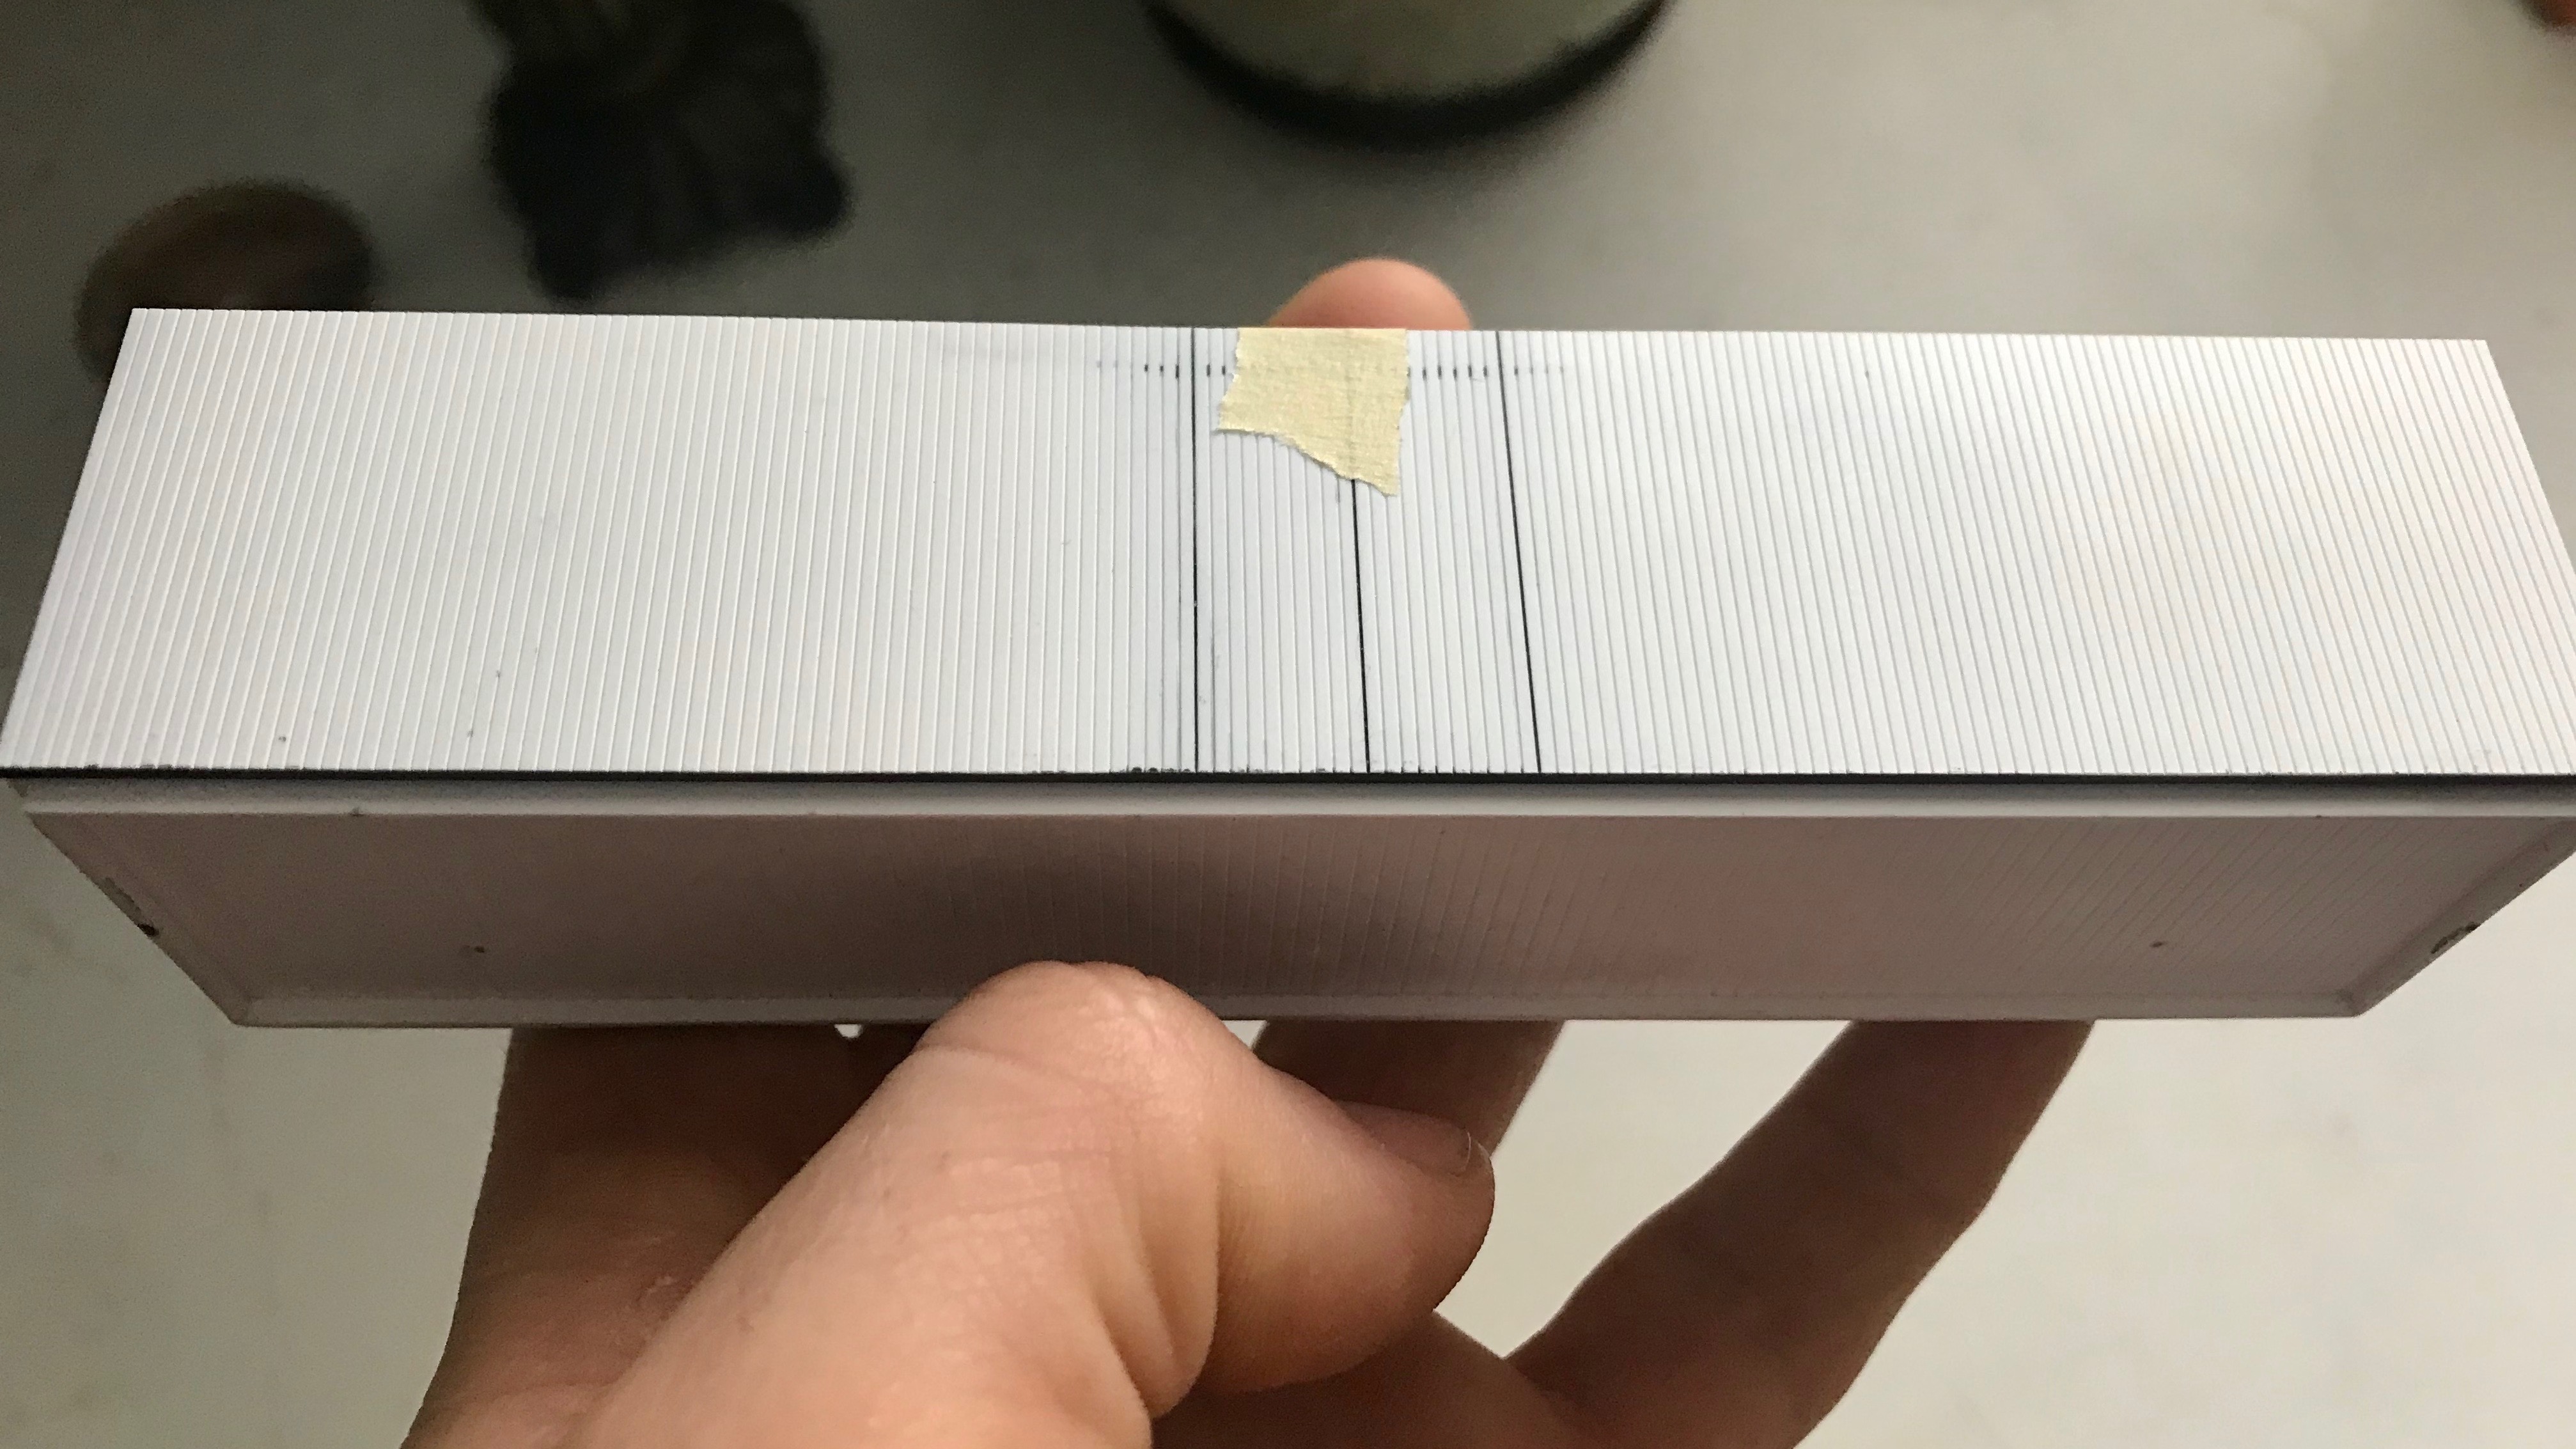
The piping was .032” Tichy PB Wire threaded through the car floor into small holes drilled into the heaters. I made the “T” joint by first filing the ends of the cut wire totally flat, then used masking tape to hold the wires together in the desired formation on top of some scrap wood. Flux was applied, and solder was liberally applied to the joint. I cleaned it up with 400 grit sandpaper, rubbing alcohol and a wire brush.

The bracing/strapping that holds the heaters to the car floor on the prototype will be installed after the final under-frame installation is made


One of the first things I had to consider before taking on this project (almost a year ago !!!) was the availability of certain parts that would be rather difficult to scratch build- the big concerns being the roof hatches and the underslung heaters.

Well, I was able to find suitable hatches to use (Details West RH-1003). Still, underslung heaters were going to be a different story.

I tried emailing a certain resin kit manufacture multiple times to see if I could purchase some of their cast underslung heaters that they include in their Reefer kits but received no response.

Second, I took to Shapeways to see what I could find. I placed an order with a certain shop for some heaters that looked promising, but when I received them- though they were nice, they just didn’t look as nice as the other manufacturer’s part. And that just couldn’t do.

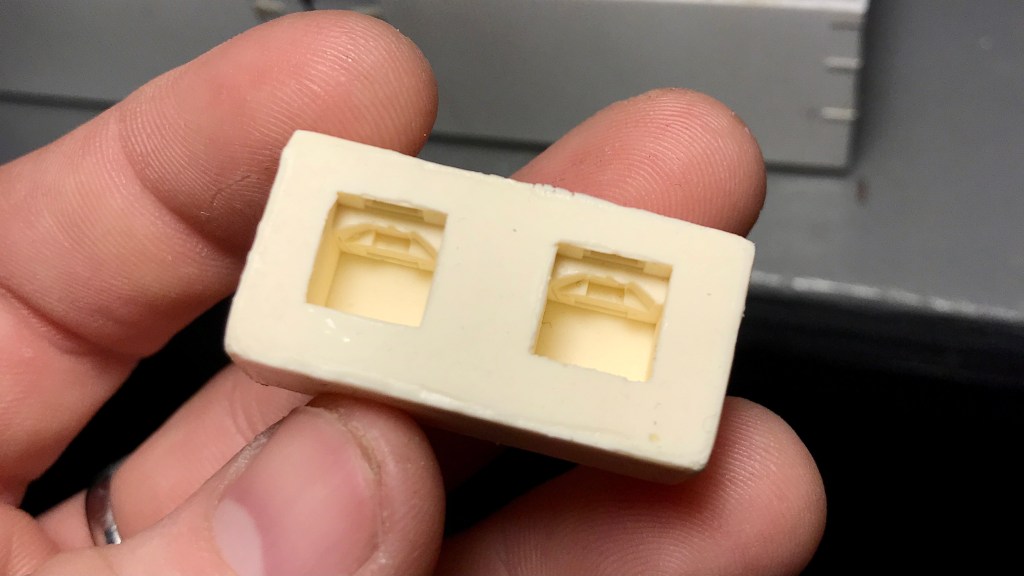
So, as a last resort, I raided a couple of unbuilt 8 Hatch Reefer kits I have in the closet, got a casting kit at Great Hobbies and cast my own resin copies of the underslung heaters; something I’d never done before.

I’ll spare the casting process, but I’m happy with how they turned out. And while it was a minor headache to not just buy the parts I wanted, this turned out to be a great learning experience, and I’ve learned a new skill.

[A note on ethics: I wouldn’t condone doing something like this (even for personal use only) if the parts in question were still in print and/or readily available. You should always support hobby shops and manufacturers whenever possible. Don’t be a dink.]

Scratch-building CN’s 40′ Wood End Bunker Reefers PT:4 [Rivets & installation of the centre sills, z-bracing and crossmembers]

Well, it’s been longer than I would have liked between updates.

This whole COVID-19 mess has certainly affected every one of us, and us in the aviation industry, especially in terms of employment. My employer has placed myself and roughly 15,000 other of my union brothers and sisters on off duty status, which has admittedly been hard to comprehend given how quickly all of this has erupted.

Without getting too personal, I’ll just say this whole mess really hasn’t left me with much motivation to write. However, as the dust of our new reality begins to settle, I’m starting to feel a little better. That said, this post isn’t nearly as beefy as I’d like it to be, and I must apologize.


Progress has continued on the reefers, and I’m really starting to get excited about where this project is headed. The fishbelly sills have been riveted with MicroMark surface decals and installed along with the z-bracing, cross-bearers, cross-members and train line.

IMG_1447.jpeg

After installing the z-bracing (which I put on the wrong way somehow! whoops!), I used my UMM saw to cut through the bracing and installed the cross braces and cross members. I went with 4×4″ Evergreen for the cross members and used my Cricut Maker to cut the cross bearers from .030″ Evergreen sheet. The cross bearers will receive a 1×6″ cap over them after the floor is glued into the cars.

60753719966__51C9BE7E-28A4-4EF0-A7AB-C59859C6DA26

With the sill, z-bracing and supports installed I figured now would probably be a good time to install the tramline as it needs to be threaded through the cross-bearers. I bent .020″ Tichy PB wire directly over top of the scaled down general arrangement drawings, cut it into two pieces and installed it into the car with CA. This was repeated for both cars.

IMG_1448

Another view of the under frame.

Next time, I intend to make a drill jig for the side and end grab irons using the engraving tip on my Cricut Maker. I plan to design the jig in 2D with CAD, engrave it onto a .010″ brass sheet (or a soda can), cut it out, fold it against a vice and then use my pin vice to punch the holes before using it to drill out for the grabs.

We’re all facing a lot of stress right now… I encourage you to take some time and work on or run your models. We all need to get our minds off of things. Please wash your hands and stay home.

CM

Scratch-building CN’s 40′ Wood End Bunker Reefers [PT:2 Doors and Corner Bracing]


IMG_1057

The car siding is now attached to the car’s core. .005 corner bracing and Grandt Line door hardware added.

After finally having some time to clean up my workbench I was able to continue with my scratch-build of CN’s 40′ Wood End Bunker Reefers.

Using a nibbler, I began by cutting the doors out of the car siding. I then glued the car siding to the body using a scale 6″ spacing jig I made to ensure a uniform 6″ of the core remained visible all along the bottom of the car. Since the car siding I used was .040″ I had to lay down a .020″ substrate into the door opening before I could install the framing. I framed the doors with 2×4″ HO scale Evergreen strip. 2×3″ HO scale strip was used for the eve above the door, 1×2″ HO scale strip was used to represent the gasket between the door and the doorframe and 2×10″ was used to represent the kicker plate below the door. The door its self was cut from .020″ Evergreen freight car siding. Grandt Line reefer hinges and door latches were used for the door hardware. I’m still waiting on a few Tichy detail parts that will complete the doors but they are about 90% finished.

IMG_1061

Close-up of the Grandt-Line door hardware.

After I finished with the door, I decided next I would notch out the sections of the under frame required to fit the coupler pockets. I installed Smoky Mountain coupler pockets in the cut-outs. I’m still not totally sold on this and may revert to the “scale” coupler pockets that come with Kadee #178, they aren’t as nice at the Smoky Mountain pockets but come closer to the look of the prototype. I will revisit this once I finish the under frame.

IMG_1014

A razor saw was used to cut through the frame. Much care was used to ensure I didn’t cut into the car siding. In hindsight it may have made more sense to cut these “notches” out before I installed the car siding over the core.

IMG_1015

A exacto knife with a brand new #11 blade was used to score along the bottom of the car siding. I used a screw driver to snap the cut pieces back.

Next I added the corner bracing on both the car body and the visible portion of the under frame. To accomplish this I cut scale 10″,6″ and 3″ strips from .005 styrene. For each corner brace I gently folded the strip over its self and then used my photo etch pliers to complete the fold- this way I got a nice crisp and straight fold. Using my NWSL Chopper II (absolutely essential for this task unless you want to cry) I then cut eight 10×12″ corner braces for the bottom of the body, eight 6×5″ corner braces for the visible portion of the under frame and sixteen 3×12″ corner braces for the upper portion of the car body.

IMG_0328

A NWSL Chopper II with the guide set to the proper length was used to ensure uniform cuts of the corner braces. The bent q-tip on the left was used to hold down the corner brace between the guide and the blade to ensure the corner brace didn’t move as it was cut.

IMG_0329

A bunch of cut out corner braces. I always make extra and use the best ones.

Next time I’ll start into the under-frame of the car, beginning with the installation of the truck bolsters. I was going to scratch build the bolsters but the Tichy ones are pretty close and already sit the car at the proper height.

After the bolsters I’ll install the Z stringers and fishbelly. The stringers will be made from strip styrene, glued together to make a Z shape. The fish belly under-frame will be cut from sheet styrene of a thickness yet to be decided.

I have some tricks up my sleeve for the brake rigging and the roof is already on my mind as well.

I’m really happy with how this build is progressing and I am picking up a lot of new skills along the way.

Until next time,

CM

REEFER MADNESS: Scratch-building CN’s 40′ Wood End Bunker Reefers [PT:1 Car Body]

CN 208571T.A. Watson photo, Ian Cranstone collection

CN Wood End Bunker Reefer #208571 (Series 3). Photo: nakina.net

Some time ago Steve Hunter showed me photos of his beautifully finished Norwest Models CN Wood End Bunker Reefer kits. This planted the seed for a small obsession with these wooden reefers built between 1926 and 1932.

Knowing that I would eventually need a few of these cars to compliment my fleet of F&C and True Line 8 Hatch Reefers (which will be regulars at the Vernon River Co-op warehouse!) I searched high and low for years for even just one Norwest Kit, to no success.

Armed with general arrangement drawings sourced from the C. Robert Craig Memorial Library and a copy of Railroad Model Craftsman (June 2001) featuring Stafford Swain’s wonderful article on this prototype I set out to begin scratch building a pair.

I began the preliminary work on the project by sourcing decals from Black Cat Publishing, trucks from Tahoe Model Works, 3D printed underslung charcoal heaters and liquidometers from Shapeways and many of the other detail parts and styrene stock I would require to complete the build.

By studying the drawings I determined that it might prove easiest to build the car body in three layers. A inner core, a main core and finally an outer layer of Evergreen freight car siding.  (All layers .040″)

  • The inner core would provide a solid foundation for the car’s floor to sit on which would be made from Evergreen V-Groove siding. This would be the main core to which the entire car would be built off of.
  • The main core’s purpose would be to simulate the 6 scale inches of steel under frame and would be cut 6 scale inches taller than the inner core to achieve this.
  • Finally, the outer layer of Evergreen freight car siding would be cut 6 scale inches shorter than the main core. The freight car siding would then be placed around the main core using a jig made from styrene to ensure a uniform 6 inches of the main core remained visible all the way around the model.


After constructing the inner and main cores, the next step was to cut the car siding to fit around the car body. Once I made the cuts I marked where the doors would be cut out. Using the previously mentioned jig I taped the siding to the car to test the look and to ensure everything lined up properly.

IMG_0967

4 car sides made of Evergreen freight car siding cut and marked for their door openings.

reeferbottomsides

This view shows what the siding will look like when finally glued to the car. This also shows the 6″ of the main core that represents the visible steel under frame of the prototype. Eventually Archer and Micromark rivet decals will be used to detail it.

IMG_0977

The spacing jig I made to ensure a uniform 6″ of the main core remains visible all the way around the bottom of the car body.

IMG_0974

Sitting on trucks just for fun, this car is starting to look a little less like a time consuming rectangle and more like a wooden reefer!

After a few failed attempts at cleanly cutting out the doors out of the car and subsequently having to cut out new sides I decided I needed a different approach.

Browsing around on a few different model railroading forums I came to the conclusion that a nibbler seems to be the way to go in regards to cutting square, clean doors (and windows) from sheet styrene when the standard #11 blade won’t do the job cleanly. With that knowledge I ordered one from Amazon and I should see it next week.

Sometimes I need to remind myself that it’s often best to tape a step back, take some time to plot the next move and then come back with a new approach and fresh mindset.

I hope to return to this build soon- when I finally have the door openings cut out and installed I will be able to turn my attention to the steel under frame.

I already have some ideas brewing.

CM

Learning the lay of the land:

I decided to begin my research on Vernon River by first digging into the type of freight traffic the village would typically see.

By far, my favourite types of rolling stock to model are reefers, stock cars and tank cars: so I knew that whatever prototype I did choose would need to tick off most, if not all, of those boxes.

As detailed in the PEI government’s 1958 air photos, by the late 1950s, Vernon River had two potato warehouses along the public siding and a CO-OP Warehouse with its dedicated three-car siding. These buildings, by their nature, would generate a significant amount of reefer and boxcar traffic. Especially so leading up to the potato harvest, the railroad would have reefer cars staged pretty well wherever they could fit them island wide.

What was less evident to me about Vernon River was the amount, if any, livestock traffic the village received- let alone enough to have a stock pen on site.

A dig into UPEI’s newspaper archives located the following advertisements:

“Loading hogs for Canada Packers at Vernon River every Tuesday afternoon. Trucking where possible. Ralph Lea.” [March 25, 1948]

Swift Canadian Co. LTD loading hogs at Vernon River [Feb 1953]

BUYING HOGS— I will buy hogs at Vernon River Station on Thursday the 24th inst. Alex McMillan [March 22, 1921]

Indeed, referring back to the 1935 PEI air survey of Vernon River shows what appears to be a stock pen east of the station. Compared to the 1958 photo, it is shown that sometime between 1935 and 1958, the stock pen was demolished. Considering the 1953 newspaper advertisement for Swift Canada loading hogs, which is the last livestock loading advertisement I could find for Vernon River, it is more likely that the stock pen was torn down sometime between 1953 and 1958.

For me, this isn’t a big deal. Since I loosely base my era on the late 50s, I can justify including this stock pen on the layout. Since no plans for the stock pen exist, I will use drawings my friend Chris Mears made of the stock pen at Millview for the basis of a stand-in model.

I plan to address other types of rail traffic Vernon River would receive in my next post.

Until then,
CM