Scratch-building CN’s 40′ Wood End Bunker Reefers [PT:2 Doors and Corner Bracing]


IMG_1057

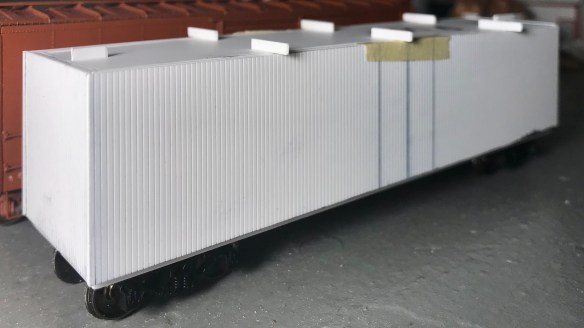
The car siding is now attached to the car’s core. .005 corner bracing and Grandt Line door hardware added.

After finally having some time to clean up my workbench I was able to continue with my scratch-build of CN’s 40′ Wood End Bunker Reefers.

Using a nibbler, I began by cutting the doors out of the car siding. I then glued the car siding to the body using a scale 6″ spacing jig I made to ensure a uniform 6″ of the core remained visible all along the bottom of the car. Since the car siding I used was .040″ I had to lay down a .020″ substrate into the door opening before I could install the framing. I framed the doors with 2×4″ HO scale Evergreen strip. 2×3″ HO scale strip was used for the eve above the door, 1×2″ HO scale strip was used to represent the gasket between the door and the doorframe and 2×10″ was used to represent the kicker plate below the door. The door its self was cut from .020″ Evergreen freight car siding. Grandt Line reefer hinges and door latches were used for the door hardware. I’m still waiting on a few Tichy detail parts that will complete the doors but they are about 90% finished.

IMG_1061

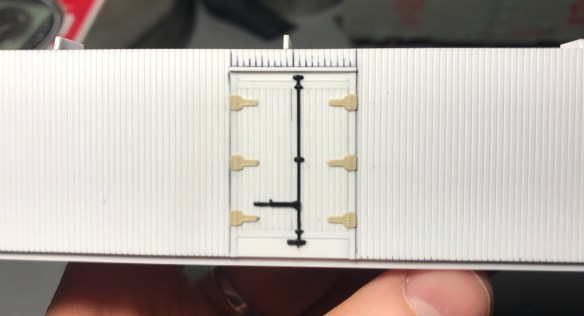
Close-up of the Grandt-Line door hardware.

After I finished with the door, I decided next I would notch out the sections of the under frame required to fit the coupler pockets. I installed Smoky Mountain coupler pockets in the cut-outs. I’m still not totally sold on this and may revert to the “scale” coupler pockets that come with Kadee #178, they aren’t as nice at the Smoky Mountain pockets but come closer to the look of the prototype. I will revisit this once I finish the under frame.

IMG_1014

A razor saw was used to cut through the frame. Much care was used to ensure I didn’t cut into the car siding. In hindsight it may have made more sense to cut these “notches” out before I installed the car siding over the core.

IMG_1015

A exacto knife with a brand new #11 blade was used to score along the bottom of the car siding. I used a screw driver to snap the cut pieces back.

Next I added the corner bracing on both the car body and the visible portion of the under frame. To accomplish this I cut scale 10″,6″ and 3″ strips from .005 styrene. For each corner brace I gently folded the strip over its self and then used my photo etch pliers to complete the fold- this way I got a nice crisp and straight fold. Using my NWSL Chopper II (absolutely essential for this task unless you want to cry) I then cut eight 10×12″ corner braces for the bottom of the body, eight 6×5″ corner braces for the visible portion of the under frame and sixteen 3×12″ corner braces for the upper portion of the car body.

IMG_0328

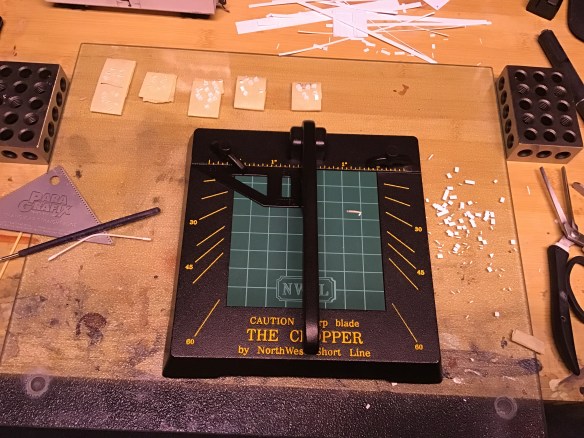
A NWSL Chopper II with the guide set to the proper length was used to ensure uniform cuts of the corner braces. The bent q-tip on the left was used to hold down the corner brace between the guide and the blade to ensure the corner brace didn’t move as it was cut.

IMG_0329

A bunch of cut out corner braces. I always make extra and use the best ones.

Next time I’ll start into the under-frame of the car, beginning with the installation of the truck bolsters. I was going to scratch build the bolsters but the Tichy ones are pretty close and already sit the car at the proper height.

After the bolsters I’ll install the Z stringers and fishbelly. The stringers will be made from strip styrene, glued together to make a Z shape. The fish belly under-frame will be cut from sheet styrene of a thickness yet to be decided.

I have some tricks up my sleeve for the brake rigging and the roof is already on my mind as well.

I’m really happy with how this build is progressing and I am picking up a lot of new skills along the way.

Until next time,

CM

REEFER MADNESS: Scratch-building CN’s 40′ Wood End Bunker Reefers [PT:1 Car Body]

CN 208571T.A. Watson photo, Ian Cranstone collection

CN Wood End Bunker Reefer #208571 (Series 3). Photo: nakina.net

Some time ago Steve Hunter showed me photos of his beautifully finished Norwest Models CN Wood End Bunker Reefer kits. This planted the seed for a small obsession with these wooden reefers built between 1926 and 1932.

Knowing that I would eventually need a few of these cars to compliment my fleet of F&C and True Line 8 Hatch Reefers (which will be regulars at the Vernon River Co-op warehouse!) I searched high and low for years for even just one Norwest Kit, to no success.

Armed with general arrangement drawings sourced from the C. Robert Craig Memorial Library and a copy of Railroad Model Craftsman (June 2001) featuring Stafford Swain’s wonderful article on this prototype I set out to begin scratch building a pair.

I began the preliminary work on the project by sourcing decals from Black Cat Publishing, trucks from Tahoe Model Works, 3D printed underslung charcoal heaters and liquidometers from Shapeways and many of the other detail parts and styrene stock I would require to complete the build.

By studying the drawings I determined that it might prove easiest to build the car body in three layers. A inner core, a main core and finally an outer layer of Evergreen freight car siding.  (All layers .040″)

  • The inner core would provide a solid foundation for the car’s floor to sit on which would be made from Evergreen V-Groove siding. This would be the main core to which the entire car would be built off of.
  • The main core’s purpose would be to simulate the 6 scale inches of steel under frame and would be cut 6 scale inches taller than the inner core to achieve this.
  • Finally, the outer layer of Evergreen freight car siding would be cut 6 scale inches shorter than the main core. The freight car siding would then be placed around the main core using a jig made from styrene to ensure a uniform 6 inches of the main core remained visible all the way around the model.


After constructing the inner and main cores, the next step was to cut the car siding to fit around the car body. Once I made the cuts I marked where the doors would be cut out. Using the previously mentioned jig I taped the siding to the car to test the look and to ensure everything lined up properly.

IMG_0967

4 car sides made of Evergreen freight car siding cut and marked for their door openings.

reeferbottomsides

This view shows what the siding will look like when finally glued to the car. This also shows the 6″ of the main core that represents the visible steel under frame of the prototype. Eventually Archer and Micromark rivet decals will be used to detail it.

IMG_0977

The spacing jig I made to ensure a uniform 6″ of the main core remains visible all the way around the bottom of the car body.

IMG_0974

Sitting on trucks just for fun, this car is starting to look a little less like a time consuming rectangle and more like a wooden reefer!

After a few failed attempts at cleanly cutting out the doors out of the car and subsequently having to cut out new sides I decided I needed a different approach.

Browsing around on a few different model railroading forums I came to the conclusion that a nibbler seems to be the way to go in regards to cutting square, clean doors (and windows) from sheet styrene when the standard #11 blade won’t do the job cleanly. With that knowledge I ordered one from Amazon and I should see it next week.

Sometimes I need to remind myself that it’s often best to tape a step back, take some time to plot the next move and then come back with a new approach and fresh mindset.

I hope to return to this build soon- when I finally have the door openings cut out and installed I will be able to turn my attention to the steel under frame.

I already have some ideas brewing.

CM